Friday, 23 April 2021

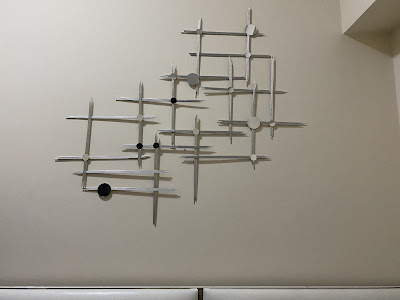
Metallic Wall Decor


The aesthetic value added to a place through a piece of art pleases both the eye and the mind. When the piece of art is done by oneself using their own creativity beautifies the place even more. Even the smallest detailing used to design your personal place should be fun and your flavour is added to give a personal touch to the space. 

Let’s get started to prepare a metallic wall decor without the actual use of metal, but through wooden skewers and give a metallic touch to it using a spray paint. I am sure this process is going to fun and exciting.


Requirements:

Wooden skewers, silver/gold metallic spray paint, tiny round shape craft mirrors, glue gun and double sided tape.

Step 1: Take three wooden skewers/ barbecue sticks and place it together. Stick the 3 sticks together using the glue gun. (Apply the glue only towards back side of the sticks)

Step 2: Repeat the same step 23 times by simultaneously following the same instructions as of step 1. You’ll require 69 wooden skewers to prepare this. 

Step 3: Apply spray paint for all these sticks. The spray paint can be applied only towards the front side of the wooden stick (the glued part need not be painted as that side will be covered by the wall).

Step 4: Once the paint gets dried up you can join these 23 set of metallic sticks using the glue gun as per the desired shape or as per the one shown in the image.

Step 5: Once the entire metallic sticks are set up, you can stick the tiny round shape craft mirrors at the corner end and in between the sticks.

Step 6: The wall decor can be stuck to the wall using the double sided tape. I have used double sided tape from 3M brand which is specifically designed for sticking to the wall without creating any damage to the wall/paint. 

You can place this in the space of your choice, or create a backdrop for your sofa set or bed. This piece of art is simple and easy to make and yet gives an elegant look to your space.

Wednesday, 18 March 2020

Message in a Bottle

Writing a message to a person can be as natural as talking to them. Sometimes we tend to express more about our feelings through written communication rather than word of mouth. On the other hand, if we are disturbed with the things happening around us and we want to move on from it, the best way to overcome it is by writing it down in a piece of paper and just tear it apart and throw it. Written communication can be used for different purposes and hence, I had decided to use this for my art purpose and convey my messages in this cute little bottle.
I’ve used a ready made bottle for this. Plain glass bottles are also available in various shops and e-commerce sites.

I must tell you that while your dear ones are reading it, they’ll definitely have a smile on their face. They’ll be more curious to open each note and find out what interesting is written on it. This gift is easy to be prepared and will be memorable gift for your dear ones. 

Requirements: Small bottle, colour papers, threads, scissors, pen and scale.

Step 1: Take colour papers and cut it into length of 4 cm and breadth of 3 cm each. The number of colour papers depends upon the number of messages you want to write.
Step 2: Write the messages inside each colour papers.
Step 3: Make small rolls of these papers.
Step 4: Take colourful threads and roll it 5-6 times around the rolled paper. Roll the threads towards the centre of the paper. You can even tie knot at the end of the thread so that the paper won’t get opened.
Step 5: Place all the rolled papers inside the bottle. Now your message in the bottle is ready to be gifted.


It’s not always necessary that you have to write the message inside the bottle and then give it to your dear ones. Instead you can also make it interesting by putting only plain papers inside the bottle and give the task to make your dear ones fill it. For instance you can give them the task of writing down their wish list in it and both of you’ll can fulfil the wish and strike it off, you can make them write their favourite quotes, best moments of their life and so on. 

Wednesday, 11 March 2020

Wall Art Geometric Heart

Modern art is the new trend in the current era. It has a minimalist look, but it does look great. The geometric heart is also a simple and easy to make modern wall art that can give a 3D look to the wall. I must tell you that this place will definitely be a photo spot of your house.

Requirements: 3 colours of foam sheet, invisible tape, scissors, pencil and scale.
I’ve used red, golden and brown colour foam sheets. You can choose any 3 colours of your choice. You can even replace foam sheets with chart papers. But as chart papers doesn’t have a shiner texture like that of shiney foam sheets, I preferred to use foam sheets.


Step 1: Take a foam sheet and make a square box of 20cms from all the sides. Now draw a diagonal line between the square.
Step 2: Cut those pieces with the help of scissors. First cut the square portion and then the diagonal line. Now you’ll have two triangular sheets.

Note: The geometric heart is made up by assembling 20 triangular sheets. As we are preparing this using 3 colours, we can make 7 triangles of two colours each and 6 triangles of one colour.

Step 3: Take the invisible tape and stick it towards the back portion of the foam sheet. I’ve stuck the geometric heart towards the corner two sides of the wall. You can also place the entire geometric heart even towards any one portion of the wall.
You can even make small marking on the wall using the pencil in case if your not sure if it is stuck straight.
Step 4: There are totally 4 layers in this wall art. In order to have a proper dimension while sticking the sheet, I started with the second layer first and then continued with the first, third and fourth layer. By doing so, I was able to complete my wall art accurately. Finally, the wall art is ready.

Note: For best results, make sure the measurements while marking in the foam sheet is accurate.

Tuesday, 16 January 2018

Christmas Card


Christmas Greeting is the way of conveying your Christmas wish your loved ones. This card will give you an idea as to how to gift a card in a creative way. 

Requirements:
Chart paper, colour papers, glue, scissors, sketch pens and glitter pen. 

The procedure to make the card have been explained below. 

1st page:
A video will be uploaded in the next blog as to how to make the Frock.

2nd page:
Steps:
1. Take thin strips of colour paper and cut both the edges into cone shape and stick it.
2. After sticking,  you can fill in your Christmas wishes.

3rd page:
Steps:
1. Draw the jar and make a thick outline to it.
2. Take colour papers and cut it into strips of length 5cm and width 3cm.
3. Stick only 1 edge of the colour paper to the page and after it dries, roll the colour paper.
4. To make it look attractive you can make small golden colour stars.
Inside the paper rolls you can write the wishes that you want to fulfil for New Year.


Sunday, 31 December 2017

Scrap Book

Scrap Book is a beautiful way of speaking your hearts out to your loved ones. Here, you can express your feelings with the help of images or pictorials. 

1st page:
1.Take the chart paper and make 2 hearts of two different colours.
2. Stick one heart to the chart paper (fully) and take another heart and fold it into two equal halves and stick the folded part of the heart above the heart which is already attached to the chart.
3. Prepare three clouds with white paper and stick it with the help of double gum tape.
4. Similarly prepare the pots and a small heart and connect the small heart with the two pots using threads.
5. To make it look attractive, you can add borders to it.

2nd page:
Candle:
6. Take colour papers and roll it and stick the edge of the colour paper with the help of a glue.
7. Take six threads of 2 cm each and attach it to the candle at the top.

3rd page:
8. Take colour papers and cut it into thin strips and stick it to the chart paper.
9. Take small colour papers and write code words on it and stick it to the chart paper with the help of double gum tape.

4th page:
10. Write the wordings in white thin strips and stick it to the chart paper.
11. Take red colour paper and make small hearts out of it and stick it to the chart paper.

5th page:
12. Take 2 buttons and stick to the colour paper.
13. Now, you can draw the picture of the boy and the girl holding hands together
Last page:
14. Take chart paper and cut it into thin strips. To make it look attractive, you can make borders for it.
15. Take popsicle sticks and stick at the backside of the thin strips.
16. Finally, you can write in it.
17. After the sticks are ready, you can take another chart paper and make a holding to the thin strips.

After doing all these, the last step is to attach all these pages together. For this,  you need to make 2 small holes with the help of a punching machine and tie it using a ribbon. 

Chocolate Bouquet

Do you want to surprise your loved ones by gifting them with chocolates in a different way? Here's an amazing idea for you all. Instead of gifting chocolates in boxes, why not give them in a form of bouquet. Isn't it different? Your loved ones will definitely start admiring at you by looking at your level of creativity.


Requirements:
15 Nestlé Munch chocolate (any other chocolate of your choice), chart paper, double sided gum tape, 1 sheet of bouquet wrapper, gum tape and ribbon.
Steps:
1. Take the chocolate and stick it on the chart paper with the help of double sided gum tape in an inverted triangular shape.
2. After attaching the chocolates, fold the chart paper in the form of a cone and stick it with the help of a gum tape.
3. Take the bouquet wrapper and place it below the folded chart paper.
4. Cover the folded chart paper with the help of the bouquet wrapper.
5. Attach the ribbon to the bouquet to give it an attractive look.

Finally, your bouquet is ready! Isn't it easy to prepare and attractive to look.
You can even prepare this bouquet in a different way using your creativity.

Monday, 25 December 2017

Photo frame

Requirements
Newspaper, small size stiff bound book, glue, red colour paint, chart paper, double sided gum tape, scissors
Frame:
Steps:
1. Take a small size stiff bound book and remove the entire pages from it.
2. Mark the place where the photo will be placed and remove the excess part.
3. Cover the inner and outer part of the stiff bound with the help of chart paper with the colour of your choice.

Flower (rose)
Steps:
1. Take newspaper and roll it thinly. Cover the edge of the newspaper with the help of a gum.
2. Let the length of the newspaper rolls be of different sizes. Because the flowers will be of different sizes.
3. Now, from the edge bend the newspaper rolls and make it into circular shape. Apply glue at the edge of the flower.

Final attachment:
Steps:
1. Take the flowers and stick it to the entire edge portion of the photo frame. You can stick it with the help of a glue of a double sided gum tape.
2. After the entire portion of the edge is covered with paper flowers, paint with without adding water.
3. After the paint has been dried, stick the photo to the frame from inside.

The photo frame will be in landscape format.
See through that the opening part of the book will be facing down.